Building Web Applications with Spring Boot and Spring MVC
In today’s digital world, web applications play a vital role in how we interact online. This post explores how to create a basic web application using Spring Boot and Spring MVC, helping you understand the architecture, HTTP request handling, and the advantages Spring offers for building robust applications.
What is a Web App?

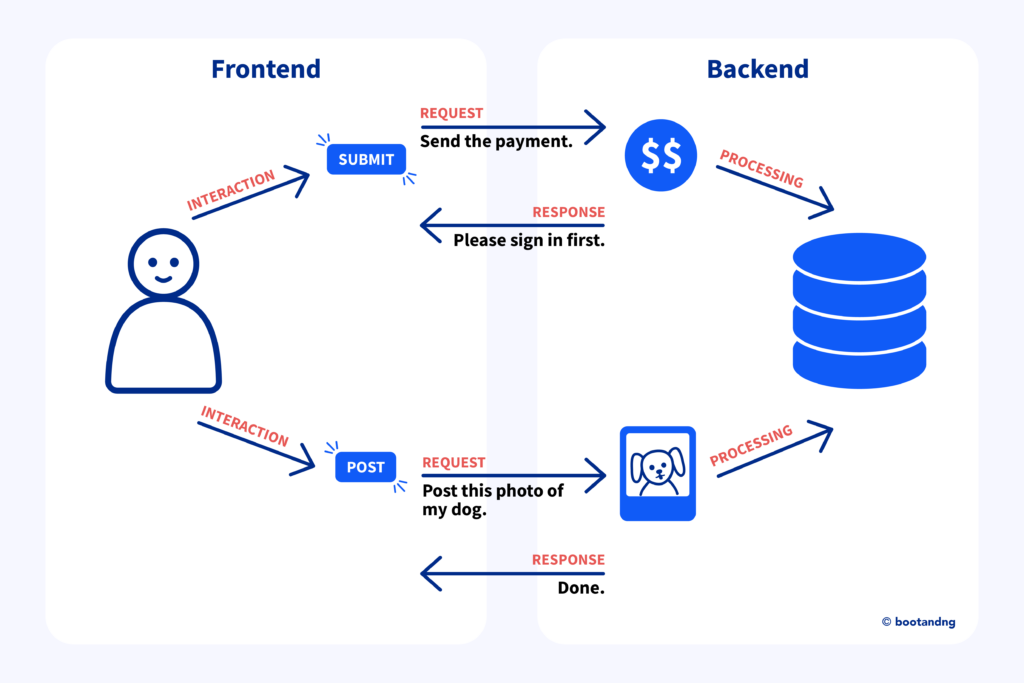
A web app consists of two main parts. The client side is what users see and interact with in their web browser, such as buttons and forms. The server side is responsible for processing data and storing information. It handles requests from the client and sends back responses.
In recent years, front-end and back-end development have evolved into two separate applications, often communicating through APIs. This separation allows developers to focus on specialized areas, improving performance and user experience. In a Spring web app, when a user wants to see their profile, the client sends an HTTP request to the server, which then responds with the requested profile data.
Understanding the Architecture of a Spring Web App
When building a web application with Spring, it’s crucial to understand how different components interact and the flow of requests. Here’s an easy-to-understand explanation of the architecture:

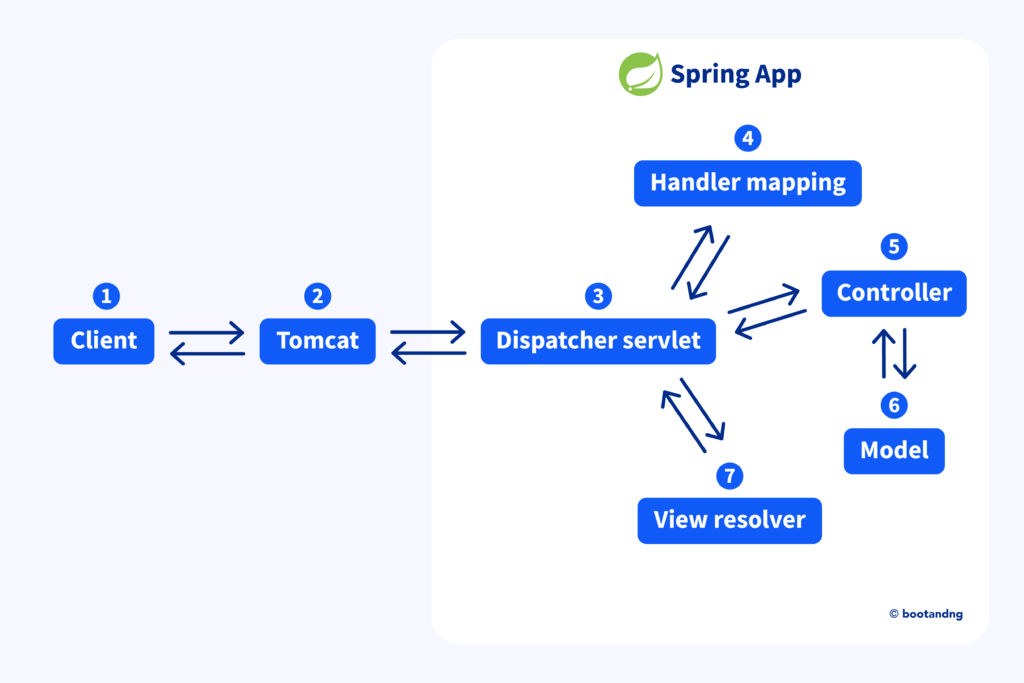
- Client: The process starts with the client, usually a web browser, which sends an HTTP request to the server. This request could be for loading a web page, submitting a form, or accessing data.
- Tomcat (Servlet Container): The HTTP request first reaches the servlet container, such as Tomcat. Tomcat acts like an “HTTP translator,” converting network-level requests into something your Java Spring app can understand. The Java code you write doesn’t directly understand HTTP, so Tomcat handles this part. However, Tomcat alone doesn’t know how to process the request—this is where the dispatcher servlet comes in.
- Dispatcher Servlet: The dispatcher servlet is the key component of Spring MVC and acts as the entry point for web requests, receiving them from Tomcat, and directing them to the appropriate controller. Think of it as a traffic director, ensuring requests get to the right place.
- Handler Mapping: The dispatcher servlet uses handler mapping to match the request to the correct controller based on the URL and HTTP method. This mapping helps the dispatcher servlet identify which controller can process the request.
- Controller: The request is then sent to the appropriate controller, a Java class marked with the
@Controllerannotation. The controller handles the request, prepares any necessary data for the model, and determines the view name that should be rendered. This view name is then passed back to the dispatcher servlet. - Model: Inside the controller, data (the model) may be prepared for the view. This data represents the information that will be displayed to the user.
- View Resolver: After processing the request, the controller returns a view name to the dispatcher servlet. The view resolver takes this view name and locates the corresponding HTML page, often rendered using a template engine like Thymeleaf.
- View: Finally, the view is rendered using the data from the model. The completed HTML page is sent back through the dispatcher servlet, then through Tomcat, and ultimately back to the client.
Important Note on Spring MVC and Spring Boot
It’s important to understand that Spring MVC by itself does not provide a servlet container like Tomcat. If you use Spring MVC without Spring Boot, you must manually set up a servlet container (like Tomcat, Jetty, or Undertow) to handle HTTP requests. Without it, your Spring MVC web app won’t function because there’s no mechanism to translate and handle HTTP communication.
Spring Boot simplifies this process by auto-configuring an embedded servlet container, such as Tomcat, allowing you to focus on your business logic rather than setup. By handling most configurations automatically, Spring Boot streamlines the development of web applications, making it easier to build and manage Spring MVC apps.
Managing Dependencies with Spring Boot
Managing dependencies in a Spring Boot application is easy thanks to the pom.xml file. At the top, you’ll find the Spring Boot starter parent:
<parent>
    <groupId>org.springframework.boot</groupId>
    <artifactId>spring-boot-starter-parent</artifactId>
    <version>3.3.4</version> <!-- Latest version at the time of the post -->
    <relativePath/>
</parent>
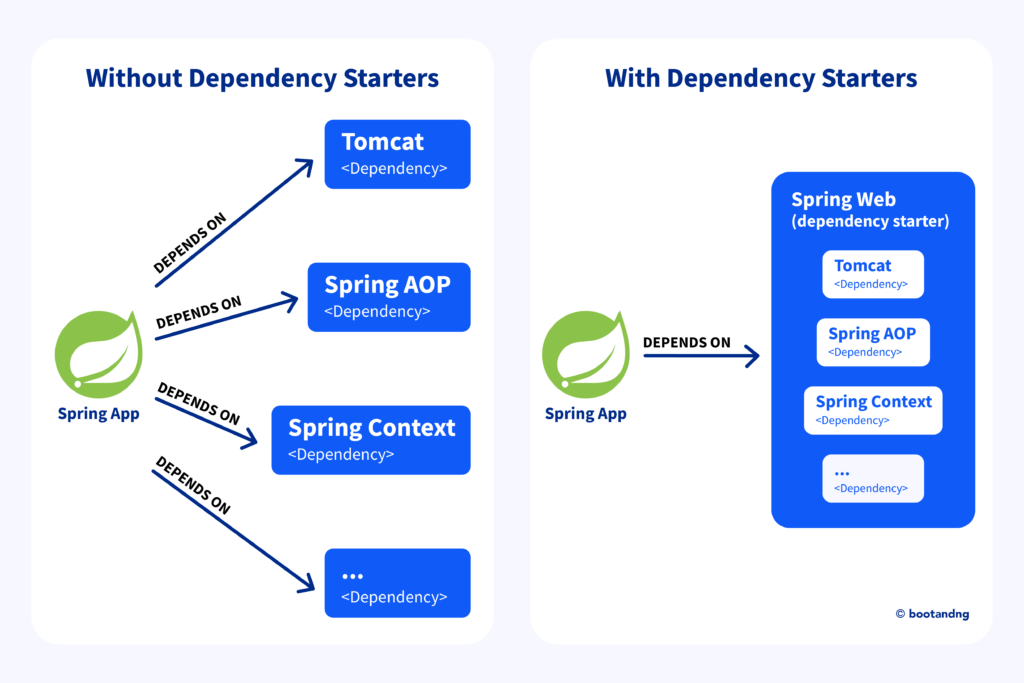
This starter parent handles dependency versions for you, ensuring everything works together smoothly. This means you typically don’t need to worry about specifying versions for the libraries you add. Spring Boot automatically selects the appropriate ones for you. Without this parent, you can’t use starter dependencies like spring-boot-starter-web, which rely on it to manage necessary versions.

To add specific functionalities, simply include starter dependencies in your pom.xml. For example, to enable web capabilities, add:
<dependency>
    <groupId>org.springframework.boot</groupId>
    <artifactId>spring-boot-starter-web</artifactId>
</dependency>
This pulls in all the libraries needed to handle web requests. There are other starters for different features, like database access and security. Using these starters simplifies setup while ensuring compatibility across your libraries.
Handling HTTP Requests
Handling HTTP requests is essential for any web app, and Spring Boot makes it super easy. First, let’s create a home.html file to display messages. Place this file in the src/main/resources/templates folder:
<!DOCTYPE html>
<html xmlns:th="http://www.w3.org/1999/xhtml">
<head>
    <title>Home</title>
</head>
<body>
    <h1 th:text="${message}"></h1>
</body>
</html>
This file uses Thymeleaf, a popular template engine in Spring, which helps generate dynamic HTML content by allowing you to embed variables like ${message} directly in the HTML. The xmlns:th attribute is essential for enabling Thymeleaf syntax in the HTML file. Spring needs a template engine like Thymeleaf to render views properly.
To use Thymeleaf, you need to add the following dependency in your pom.xml:
<dependency>
    <groupId>org.springframework.boot</groupId>
    <artifactId>spring-boot-starter-thymeleaf</artifactId>
</dependency>
Now, let’s look at a simple controller class that responds to requests using @Controller:
@Controller
public class HomeController {

    @GetMapping("/home")
    public String homePage(Model model) {
        model.addAttribute("message", "Welcome to Spring Boot!");
        return "home"; // This points to the home.html file
    }
}
In this example, @Controller tells Spring that this class will handle web requests. The @GetMapping("/home") annotation links the /home URL to the homePage() method. The Model object is automatically provided by Spring MVC, allowing us to store data we want to send to the view. When you visit http://localhost:8080/home, the home.html template is rendered with the message displayed as “Welcome to Spring Boot!” in the header.
Sending Data with HTTP Requests
Sometimes, you need to send data from the client to the server. Here are a few ways to do this:
- Request Parameters: These are key-value pairs added to the URL. For example:
http://localhost:8080/greet?city=NewYork
By default, request parameters are mandatory, meaning the client must provide them. If the city parameter is not included in the request and you don’t set required = false, you’ll receive a 404 error. However, if you want to make the parameter optional, you can use required = false:
@GetMapping("/greet")
public String greet(@RequestParam(value = "city", required = false) String city, Model model) {
    if (city == null) {
        city = "the world"; // Default value if no city is provided
    }
    model.addAttribute("message", "Greetings from " + city + "!");
    return "home"; // Reusing home.html
}
In this example, if the city parameter isn’t provided, it defaults to “the world.”
- Path Variables: These are variables embedded in the URL. For example:
http://localhost:8080/greet/NewYork
Use the @PathVariable annotation to get the value from the URL path:
@GetMapping("/greet/{city}")
public String greet(@PathVariable("city") String city, Model model) {
    model.addAttribute("message", "Greetings from " + city + "!");
    return "home"; // Reusing home.html
}
Note: Path variables should not be used for optional values since they are part of the URL structure. If the value isn’t provided, it leads to a 404 error.
- Request Body: When you need to send more complex data, such as JSON, you can include it in the request body. This is often done with POST requests.
For this example and the next one, modify the@Controllerannotation to@RestControllerin yourHomeController. We will explain the@RestControllerannotation in the next section.
@PostMapping("/register")
public String register(@RequestBody City city) {
    return "City " + city.getName() + " registered successfully!";
}
In this example, @RequestBody tells Spring to convert the incoming JSON into a City object, which has a getName() method. You would send a JSON payload like this in your request body:
{
    "name": "New York"
}
The City class needs to be defined to map the incoming data. Here’s a simple implementation:
public class City {
    private String name;

    // Default constructor needed for deserialization
    public City() {}

    public String getName() {
        return name;
    }

    // Setter method for the name property
    public void setName(String name) {
        this.name = name;
    }
}
Data coming in from the request body needs a class to map it. After calling the default constructor, the framework uses the setters to assign values. If you provide only a constructor with arguments and no default constructor, deserialization will fail because the framework needs to create an instance of the class before setting its properties. Deserialization is the process of converting JSON data into a Java object.
When you send the JSON payload through something like Postman, you should receive a response like: “City New York registered successfully!”
- Request Headers: Sometimes, you need to send additional information via headers. You can access headers in your controller like this:
@GetMapping("/city-info")
public String handleCityInfo(@RequestHeader("City-Name") String cityName) {
    return "City Name: " + cityName;
}
In this example, @RequestHeader captures the value of the City-Name header from the request. This approach is useful for sending extra information, like authentication tokens or other details, without adding them to the URL or request body.
Sending Data with @RestController
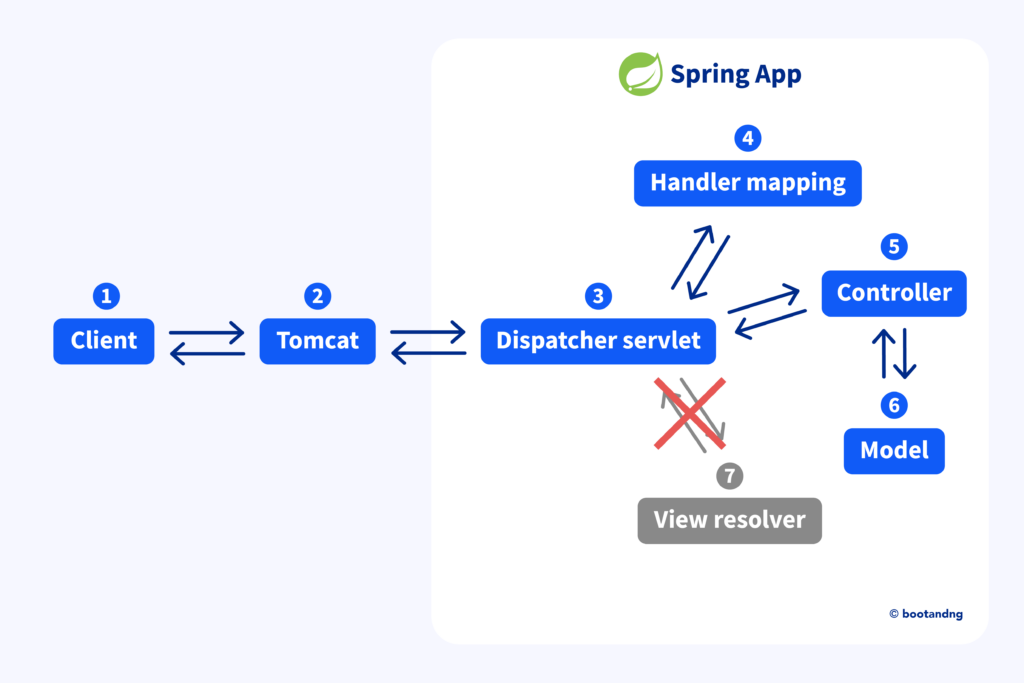
Sometimes, you might want to send data back directly without rendering a view. That’s where @RestController comes in handy. It automatically sends back data as JSON or plain text.
Here’s an example:
@RestController
public class ApiController {

    @GetMapping("/farewell/{city}")
    public String farewell(@PathVariable("city") String city) {
        return "Goodbye from " + city + "!";
    }
}
In this case, @RestController indicates that this class is for RESTful requests. RESTful services allow clients, like web browsers or mobile apps, to request information from a server using standard web requests, like those made using HTTP. When you visit http://localhost:8080/farewell/NewYork, you will receive a simple text response saying, “Goodbye from New York!”
By using @RestController, Spring skips the view resolver that typically converts data into a webpage. Instead, it directly sends back the data you return from your methods. This makes it great for creating APIs that serve data without the need for a full HTML page.

HTTP Methods
HTTP methods define how clients interact with a server. The most common methods are:
- GET: Used to retrieve data from the server. For example, when you visit a webpage, your browser sends a GET request to fetch that page.
- POST: Used to send data to the server, often for submitting forms or uploading files.
- PUT: Used to update existing resources on the server, usually replacing the entire resource.
- PATCH: Similar to PUT, but it applies partial modifications to a resource.
- DELETE: Used to remove a resource from the server.
Form Handling and JSON
Spring Boot can easily handle form submissions, but it’s important to know that standard HTML forms usually send data in a format called application/x-www-form-urlencoded. This is just a fancy way of saying that when you fill out a form on a website and hit submit, the data gets sent as key-value pairs.
Take this simple HTML form, for example:
<form action="http://localhost:8080/submit" method="post">
    <input type="text" name="name" placeholder="Your Name" />
    <input type="submit" value="Submit" />
</form>
When you submit this form, it sends the data to the server in that key-value format. But what if you want to send the data as JSON? JSON is a common format for APIs, and it allows you to structure your data more flexibly. To do this, you would typically use JavaScript. You’d grab the values from the input fields and send them to the server in JSON format. Just remember to set the Content-Type header to application/json so the server knows what to expect.
Conclusion
In summary, Spring Boot and Spring MVC provide an efficient framework for building web applications. By simplifying configuration, handling HTTP requests seamlessly, and offering dependency management, Spring Boot allows developers to focus on the core functionality of their apps, making web development more streamlined and effective.
